Customize your RealTimes
|
RealTimes sets your photo and video memories to music, and creates a video you can share. RealPlayer Cloud suggests some RealTimes for you, using photos and videos that are related in some way - taken at the same location, or on the same day, or stored in the same folder on your computer.
Select any RealTime and double-click to play.
|

|
The RealTimes window
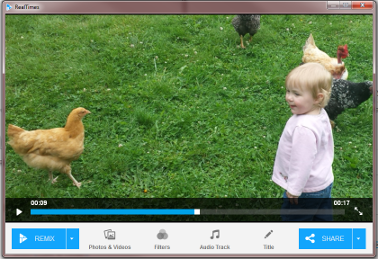
You can review the RealTime to see what you would like to change. Each time you make a change, the RealTime will stop playing, then resume when the change is applied.
- Remix - automatically changes the content and music.
- Length - on the Remix button, click the arrow to choose length.
- Photos & Videos - select the content.
- Filters - change the appearance of the photos and videos
- Audio Track - select from a list or add your own music
- Title - edit the title and date for the RealTime
Remix and Length
Remix is the easiest way to change your RealTime. Each time you click Remix, RealTimes changes the Photos & Videos and the Audio Track. It will keep the same length unless you change it.
To change the length of your RealTime, click the arrow on the right side of the Remix button, and select a length in seconds. If you make changes to the content, RealTimes will automatically adjust the length in order to fit your selections.
Photos & Videos
Click Photos & Videos to open a window where you can select which items, called "scenes" you would like to have RealTimes use. The number of scenes you choose will affect the length of your RealTime.
- Click a scene to select it (it shows a check mark), click it again to deselect it.
- Click OK to use your selections.
Filters
Click Filters to select filters to change the colors and image quality of the scenes in your RealTime. The filter will affect the entire RealTime. With each filter name, you will see an example of how an image looks with the filter.
When you click a filter, the RealTime will play with the filter applied. To try a different filter, click Filters again.
Audio Track
Click Audio Track to choose a different soundtrack for your RealTime. You can select from the music that comes with RealTimes, or add your own.
When you click a track, the RealTime will play with the music you select. To try a different track, click Audio Track again.
To use your own audio track:
- Click Add Tracks.
- Browse to the file you would like to use.
- Click Open.
RealTimes remembers the tracks you have used and they will stay in the tracks list.
Title
Click Title to edit the Title and Date displayed for your RealTime.
When you are satisfied with the Title and Date, click Apply.
How to create a RealTime from your Library
You may want to create a RealTime from items in your Library that you select yourself.
- In your Library (Photos & Videos, Recent Activity, or Albums), select some photos and videos. For best results, choose at least three.
- Right-click and select Create RealTime.
- RealTimes opens. Click Share and follow the steps.
After you click Share, the RealTime is saved to your Library as a video and uploaded.
If you would like to save your RealTime without sharing, there is an arrow on the right side of the Share button:  . Click the arrow and select Save to Cloud.
Good to know
You can also turn any Album into a RealTime: in your Library, click Albums in the sidebar, then double-click any Album to open it. Click Play RealTime on the upper left.
You have a second chance to edit the Title of your RealTime when you share it.
RealPlayer Cloud creates an Album for you called "Saved RealTimes". All the RealTimes you saved are available in that Album.
This is beta documentation of a beta product.
Not all services and features are available in all countries. Services and features will be added as they become available.
© 2014 RealNetworks, Inc. All rights reserved.